Tuesday, July 29, 2008

Saturday, July 26, 2008

Prim cliffs are done. They're not 100% perfect, but they're good enough.

I don't know when I'll be open. I only have a few more non-script related things I need to do: I need to make a vendor image for my eyelashes, retake one product picture, set out sound objects, and set up black lights to counter light bleed. Unless I'm forgetting something, that is, literally, all. If I have time, I may (in order) set out more sunbeams and fungus, try making dust mote particle emitters, and try making prim waves. (I found some beautiful waves for sale, but a couple things dissuaded me. One, the textures were 1024 x 1024. Uh, no. Two, the person was also selling basic sculpted prims for L$3000, along with an animated water texture I swear I've seen outside SL. And if this stuff is a ripoff -- and it is -- who's to say the waves aren't, also?)

The real issue now is getting my vendors set up and in place. I'm waiting on something for that, and it's out of my hands. Yes, that's right: for once, my slowness is not my fault.

Wednesday, July 23, 2008

Preview snapshot of the sim. Not that you couldn't get a peek by camming over, mind. :)


That's Nouveau in the background. And yes, there are a lot of boulders. If Oblivion has taught us anything, it's that rocks = good landscaping. ;)

People who have been by are telling me that the lag is not bad at all, something I don't understand. I'm not complaining, but it strikes me as very bizarre, given the prim and polygon counts I have.

Sunday, July 20, 2008

Miriel's Windlight Settings for Pictures

I shared these settings in FashCon Cafe, and people liked them, so I'm making a post. You need a Windlight client to do this (you need the advanced sky options), but you don't need to have the Windlight shaders enabled.

1. Go to World -> Environment -> Environment Editor. A new window will pop up.

2. Click on the Advanced Sky button. Yet another new window will pop up.

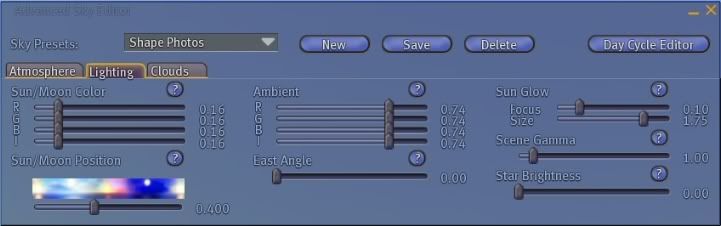
3. Go to the Lighting tab.

4. You see the Sun/Moon Position slider? Move that towards sunrise or sunset. If you move it too far towards night, the light will get a little orange; if you move it too far overhead, however, it will cast unattractive shadows. Feel free to play with it a bit, and find a setting you like.

5. Right above the Sun/Moon Position is a series of sliders called Sun/Moon Color. These control the color and intensity of the sunlight and moonlight. (The R slider controls red, the G slider controls green, the B controls blue, and the I controls the overall intensity.) Grab the I slider and move it all the way to zero. This is just to quickly set the RGB sliders to the same value. Now move the I slider up to around 0.15. Sunlight and moonlight are what actually cause "shadows" in Windlight (I put shadows in quotes because they're not true real time shadows), so turning this down minimizes unpleasant shading. It's kept a bit above zero to prevent things from looking entirely flat.

6. To the left of the Sun/Moon Color sliders are another set of sliders, these labeled Ambient. This controls the color and brightness of the ambient lighting, as you may have guessed. Grab the I slider and drag it down to zero, then raise it to around 0.75 or so. Turning up the ambient light is a way of brightening the scene without added "shadows."

7. Once you have a setting you like, click the New button, name your present, then click Save. Now when you want to use it, you just have to repeat steps 1 and 2, and then select your sky preset from the dropdown menu.

8. It may be a good idea to turn off local lighting. Lights can cast harsh highlights and shadows, and get really bright around sunrise and sunset. To turn off local lighting, go to Preferences -> Graphics. The lighting settings are near the bottom; you may need to click the Custom checkbox in order to access them.

For reference, here is what my Advanced Sky window looks like when I'm using this setting:


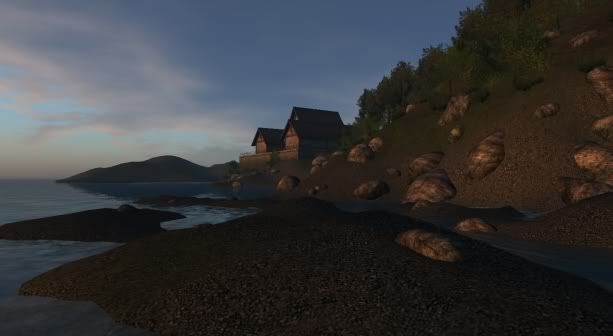
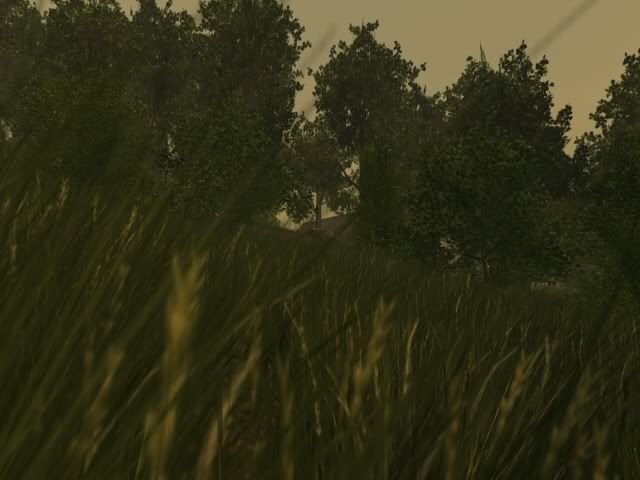
And here is what photos taken with it look like:


One last thing: If the sky or light in this setting is too boring for you, you can always try adjusting existing Windlight settings. Use the Sun/Moon Position slider to get the light at an angle you like. Move the Sun/Moon Color I slider down, and the Ambient I slider up. Just be sure to grab the I slider (unless you want to change the light color), so that the RGB sliders all move in proportion.

Thursday, July 17, 2008

I recently updated to Blender 2.46. I was very hesitant to do this, for fear of being unable to find UI elements, but there's a particular file format I want to eventually use, and I don't think 2.45 supports it.

Now, pay very close attention, because I will never, ever say these words again:

Some of the changes are actually pretty good.

There's a "lock axis" toolbar in sculpt mode now, for instance, allowing you to keep the vertices from moving along that axis as you work. Not only is it useful, but the name and mouseover descriptions are reasonable and helpful. Hold your mouse over the "x" button in the toolbar, and it says "constrain x axis." Straightforward. Sensible. It's bizarre. It's--

Oh, god, I've fallen into a parallel universe, haven't I? I bet dogs meow here and the sun rises in the west. Up is down; right is left. And back in my home dimension, the "lock axis" toolbar is signified by a plain button with a padlock and a swastika.

Tuesday, July 15, 2008

The plants are all placed! I can't believe I actually finished that. I've got a couple more landscape related things to do (one of which can wait, if it comes down to it), but other than that, it's just Golden Cage and -- ugh -- vendor and sign stuff. Putting out vendors is such a pain. I've allotted two whole days just to getting the scripts all set up.

I also worked on my store's lighting system, and I'm pretty pleased with the results; I used a whole bunch of lights to, as much as I could, produce ambient light. The tricky part about lighting is that something that looks good at midnight or noon can severely overexpose things at sunrise and sunset. I think I struck a good compromise, though: avatars only look a little out of place at midnight (my store interior is full bright), and aren't lit too harshly at sunrise/sunset.

Saturday, July 12, 2008

I continue to make progress. (For months, I wasn't. I had quit in all but name, and was right on the verge of making it official.)

All the plants on the southern coast have been placed. I'm working on the eastern coast now, and then will do the north and west. I'm giving myself two days per coast. After that, there are a few more things I have to do (mostly product photos and signs, bleargh), and I expect those will take me a few days, maybe a week if I slack off. And then I'll be done.

Thursday, July 10, 2008

Random Thoughts on Shadows

I haven't seen a lot of screenshots from the shadow client (and it won't work with my graphics card), so this blew me away. It's gorgeous. It looks almost like a real photograph. Except...

Well, except for the shadow prims. The shadow client has me a bit concerned, because -- unlike basically all the other graphical improvements thus far -- there's no happy medium. You can't make a build that looks great both with and without shadows: add in artificial shadows, and it'll look bad in a shadow client; don't add artificial shadows, and it'll look awful in a non-shadow viewer. Given the hardware requirements for the shadow viewer (and the fact that bad is still better than awful), the best thing to do is still add in shadows prims and the like, but still. The thought of having contradictory shading in my builds pains me.

Again, the shadows look fantastic. And they had to be added eventually. Still, there's a part of me that wishes they'd picked some other area to make visual improvements in -- that we'd gotten vertex painting or more forms of texture mapping or something. SL looks a lot nicer with shadows, but it'd also look a lot nicer with, say, normal mapping. (Oh, man, and don't even get me started on vertex painting. SL would look nicer and, in the hands of competent builders, run faster.)

Tuesday, July 08, 2008

Yes, I'm working on the sim again. I've even got all the plants made: now I just need to put them down (which is pretty awful work, actually).

Friday, July 04, 2008

My new vending system is done. Like the previous version I've been giving out, it's designed as an alternative to scrolling vendors and simple product boxes. When a customer pays, instead of immediately receiving an item, they're given a series of menus that allow them to choose what they want to buy. It's based off the system I use in my store.

New features for Menu Vendor 2.1:

* Support for up to four simultaneous orders
* Simpler set up: no more figuring out which scripts you need to drop in the vendor
* No more boxes! 2.1 gives folders instead, making things easier for you and your customers

If you would like a copy, IM me. It's free. Please be aware that while I've done my best to test it, I haven't used it day in and day out and could have missed various bugs. I believe it should work fine, but you use it at your own risk.

Oh, and I don't like doing tech support. I give this out on the condition that I won't be asked to.

Wednesday, July 02, 2008

Woohoo!

It still needs a bit more testing, but (fingers crossed) it looks like I've got Menu Vendor 2.0 working. It'll be free for the asking, just like the current vending system I give out.

New features in 2.0:
* Support for 3-4 simultaneous orders. (Probably 4, but a bit more testing is needed to see how much the script can handle before it implodes.)
* Simpler setup. Every vendor gets the same three scripts, no matter how many variables that product has.
* No more boxes! 2.0 gives folders instead.

New annoyances in 2.0:
* Support for 3 variables, instead of 4.
* Will slowly spam you with debit permission requests if you don't grant it that permission.
* Slightly less idiot proofing.

Tuesday, July 01, 2008

We had the first jewelry expo meeting today. The summary:

The expo will take place from Sunday, October 5th through Saturday, October 11th.

There will be 75 slots, and no application deadline. Slots will be given on a first come, first serve basis, and a waiting list will be kept. If you don't show up at the expo, your slot will be given to someone else.

There will be an L$100 entry fee. To join, pay Miriel Enfield and let her know you want in, and she'll give you an invitation to the vendor role in the Jewelry Exposition group.

The charity we'll be using is Heifer International.

Scrolling vendors are banned. I'll give out versions of my non-scrolling vendors to anyone who wants them.

A new group will be made for this, called Jewelry Exposition. Jewelry Exposition 2007 will slowly be phased out.

We're voting on the theme to use this year. (The theme will apply only to the build and promotional materials, as well as to pieces made for the charity auction. Your booth and general jewelry don't have to follow it. :) ) The choices are Arabian Nights and an aquatic theme, and the vote will go out to the Jewelry Exposition group (NOT Jewelry Exposition 2007).